There's a special kind of magic that happens when you combine the rich, creamy sweetness of white chocolate with the vibrant, tart burst of fresh raspberries, all nestled within a perfectly buttery, flaky scone. It's a culinary alchemy that elevates a simple baked good into an extraordinary experience. And when it comes to these particular white chocolate raspberry scones, many seasoned bakers agree: they might just be the best scones they've ever tasted. That's a bold claim, but once you bite into their delicate texture, savor the balance of flavors, and inhale the spectacular aroma that fills your kitchen, you’ll understand why. If you're ready to create a truly unforgettable treat, whether for a quick breakfast, an elegant afternoon tea, or a special dessert, then mastering these scones is a delightful journey worth taking. For a deeper dive into their allure, explore Why These White Chocolate Raspberry Scones Are Simply Irresistible.
The Foundation of Flavor: Mastering Your Ingredients
The secret to exceptional white chocolate raspberry scones lies not just in a well-honed recipe, but in understanding and respecting each ingredient. Every component plays a crucial role in achieving that perfect texture, rise, and harmonious flavor profile. Paying attention to quality and specific techniques for each will set your scones apart.
Flour: The Building Block
- All-Purpose Flour: This is your go-to for consistent results, providing a good balance of structure and tenderness. For most bakers, it's readily available and works beautifully.
- Bread Flour: For those seeking a slightly lighter scone, bread flour is an intriguing alternative. Its higher protein content can lead to a more delicate crumb, but it also alters the traditional scone texture, making it a recommendation for experienced bakers who have mastered the standard recipe first. If you're venturing into gluten-free baking, a 1:1 gluten-free flour blend can be substituted directly, ensuring everyone can enjoy these delightful treats. Always spoon and level your flour for accuracy, as too much flour can lead to dry, dense scones.
Butter: The Key to Flaky Perfection
This is arguably the most critical ingredient for achieving those coveted flaky layers. The "no-fail" approach to baking scones demands cold butter, and grating it is a game-changer:
- Grated and Frozen: Use the fine side of a grater to grate cold butter onto a plate. For ease, spray your grater with non-stick spray beforehand. Once grated, pop it into the freezer for a few minutes. This ensures the butter remains incredibly cold and in tiny, evenly distributed pieces.
- The Science: As the scone bakes, these minute pieces of cold butter melt, releasing steam that creates pockets of air, resulting in those irresistible flaky layers. This technique minimizes the butter melting into the dough prematurely, a common pitfall that leads to dense scones.
Sugar: Just the Right Sweetness
A perfectly balanced scone isn't overly sweet; it lets the other flavors shine. Granulated sugar in the dough provides a subtle sweetness and aids in browning. For an added touch of texture and sparkle, a sprinkle of turbinado sugar on top before baking creates a delightful crunchy crust and a beautiful finish.
White Chocolate: Quality Over Quantity
The quality of your white chocolate can make or break these scones. Avoid products that are primarily milk, oil, and sugar, as they won't melt properly and lack true flavor. Instead:
- Look for Cocoa Butter: Choose a good quality white chocolate with at least 20% cocoa butter and no more than 55% sweeteners. This ensures a rich, creamy flavor and a smooth melt.
- Chop Your Own: While white chocolate chips are convenient, chopping a good quality white chocolate bar often yields superior flavor and a more desirable melt in the scone.
Heavy Whipping Cream: The Binder
Heavy whipping cream provides richness and moisture, binding the dough together. The amount needed can vary slightly based on environmental factors:
- Humidity Matters: In humid climates (like summer), you'll likely need less liquid, perhaps starting with 1/2 cup. In drier conditions (like winter), you might need closer to 2/3 cup.
- Listen to Your Dough: Always start with the smaller amount of liquid and add more a tablespoon at a time until the dough just comes together. It should be shaggy but not sticky. If you're out of heavy cream, half-and-half or even whole milk can be used, though they will yield a slightly less rich scone.
Raspberries: The Tart Counterpoint
The vibrant, tart raspberries are essential for cutting through the richness of the white chocolate and butter. You have options:
- Frozen Raspberries: Many bakers prefer frozen as they are less prone to breaking apart and bleeding their color into the dough prematurely. To use them, toss the frozen berries with about a tablespoon of flour (or enough to coat) and place them back in the freezer until you're ready to add them. This helps prevent them from clumping and sinking. Don't worry if a little red still shows – it adds to the charm!
- Fresh Raspberries: If using fresh, rinse them gently and then lay them out on paper towels to dry completely. Excess moisture can make your dough sticky. Add them at the very last stage of mixing to minimize breakage.
For more detailed advice on selecting the best ingredients, be sure to read Perfect White Chocolate Raspberry Scones: Ingredient Choices for Success.
Crafting the Dough: Technique is Key
With your ingredients perfectly prepped, the next step is to bring them together using techniques that ensure a light, tender scone. This isn't a project that rewards heavy-handedness; gentle handling is paramount.
Combining Dry and Wet
Start by whisking your dry ingredients together thoroughly. This ensures even distribution of leavening agents. Then, gently cut in your cold, grated butter. You can use your fingertips, a pastry blender, or even a food processor (pulsing briefly) until the mixture resembles coarse crumbs with some pea-sized butter pieces still visible. This textural variation is key to flakiness.
Introducing the Liquid
Gradually add your heavy cream, starting with the smaller amount. Mix with a fork or your hands until the dough just begins to come together. Avoid overmixing at all costs! Overworking the dough develops gluten excessively, leading to tough, chewy scones rather than light, tender ones. The dough should be shaggy and moist enough to hold together, but not wet or sticky.
Folding in the Raspberries and White Chocolate
This is where the magic happens! Gently fold in your chosen raspberries and white chocolate. If using frozen berries, they should be well-coated in flour and still frozen. Be delicate to prevent crushing the berries and coloring the dough too much. A few quick folds are all you need to distribute them evenly.
Shaping and Cutting
Turn the dough out onto a lightly floured surface. Pat it into a round or rectangular shape about 3/4 to 1 inch thick. Resist the urge to use a rolling pin, as this can compress the dough and inhibit its rise. Use a sharp biscuit cutter or a knife to cut the scones. For round scones, press straight down without twisting; twisting can seal the edges and prevent them from rising tall. For triangular scones, cut the round into wedges. Place the cut scones on a parchment-lined baking sheet.
The Freezer Advantage: Bake Now or Later
One of the beauties of this scone recipe is its freezer-friendly nature. Unbaked scone dough freezes beautifully, allowing you to pop one (or more!) into the oven whenever a craving strikes. Simply freeze the cut scones on a baking sheet until solid, then transfer them to an airtight freezer bag for up to 2-3 months. When ready to bake, place them directly from the freezer onto a baking sheet and add a few extra minutes to the baking time.
Baking to Golden Perfection
Bake your scones in a preheated oven until they are golden brown on top and the edges are set. The high heat helps them rise quickly and creates a crisp exterior while maintaining a tender interior. And yes, your kitchen will smell absolutely spectacular during this process – a delightful preview of the treat to come!
The Finishing Touch: Glaze and Presentation
While delicious on their own, a simple vanilla glaze provides the perfect flourish, adding an extra layer of sweetness and a touch of elegance to your white chocolate raspberry scones.
Crafting the Vanilla Glaze
A basic vanilla glaze is incredibly easy to make. Whisk together powdered sugar with a splash of milk or heavy cream and a touch of pure vanilla extract until it reaches a smooth, pourable consistency. You want it thick enough to coat a spoon, but thin enough to drizzle artfully. For an extra pop of flavor, consider adding a tiny pinch of salt to balance the sweetness.
Drizzling for Delight
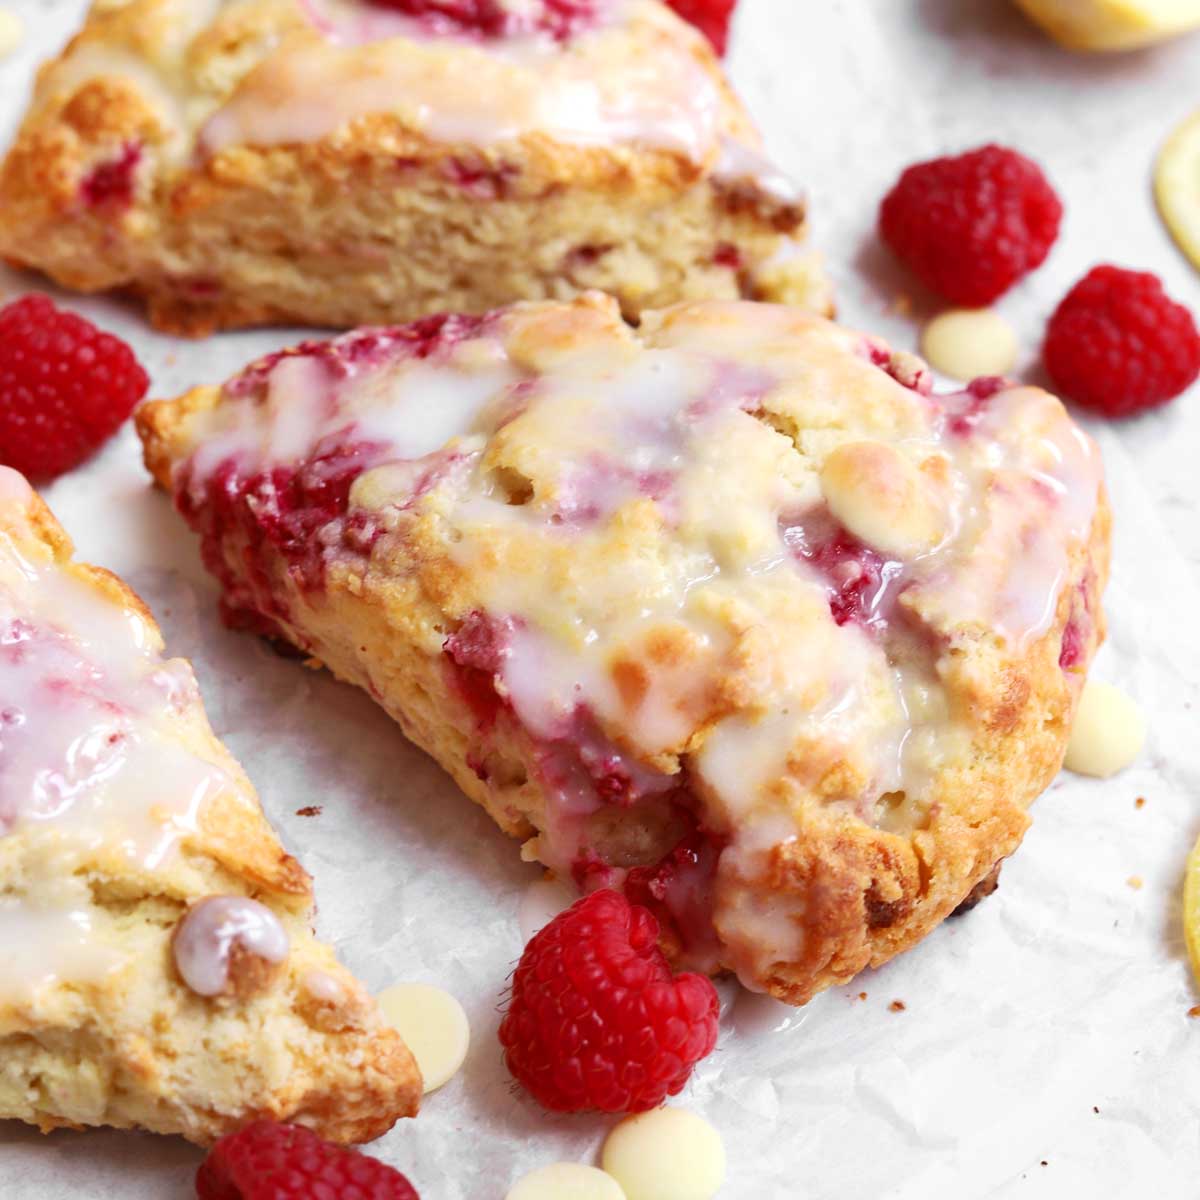
Once your scones have cooled slightly – they should still be warm, but not piping hot – drizzle the vanilla glaze generously over the tops. The contrast of the pristine white glaze against the golden-brown pastry and the pops of red raspberry makes for a truly pretty presentation. This vibrant, juicy, and beautifully presented treat is not just a feast for the taste buds but also for the eyes.
Serving Suggestions and Beyond
These scones are incredibly versatile. They are perfect for:
- A Quick Breakfast: Pair them with your morning coffee or tea for an indulgent start to the day.
- A Special Dessert: Serve them warm with a dollop of whipped cream or a scoop of vanilla ice cream for an impressive finale to any meal.
- An Impromptu Afternoon Tea Party: Their elegance and delightful flavor make them ideal for entertaining, especially when paired with a classic Earl Grey or English breakfast tea.
Moreover, baking these scones can be a fun and engaging project to do with kids. The tactile experience of mixing, shaping, and decorating can turn a simple recipe into cherished family memories. It’s a rewarding activity that teaches basic baking skills while producing something truly delicious.
Conclusion
Mastering white chocolate raspberry scones is more than just following a recipe; it's about appreciating the nuances of ingredients and techniques that culminate in a truly spectacular bake. From the initial aroma that wafts through your home to the final, unforgettable bite, these scones offer a sensory experience that’s hard to beat. Their perfect blend of flaky pastry, tart raspberries, sweet white chocolate, and a delicate vanilla glaze makes them a beloved classic that stands out from the crowd. Whether you're a seasoned baker or just starting your culinary journey, these tips and insights will empower you to create scones that are not just good, but potentially your all-time favorite. So, roll up your sleeves, gather your ingredients, and prepare to be utterly charmed by the delightful magic of homemade white chocolate raspberry scones.
